Introduction
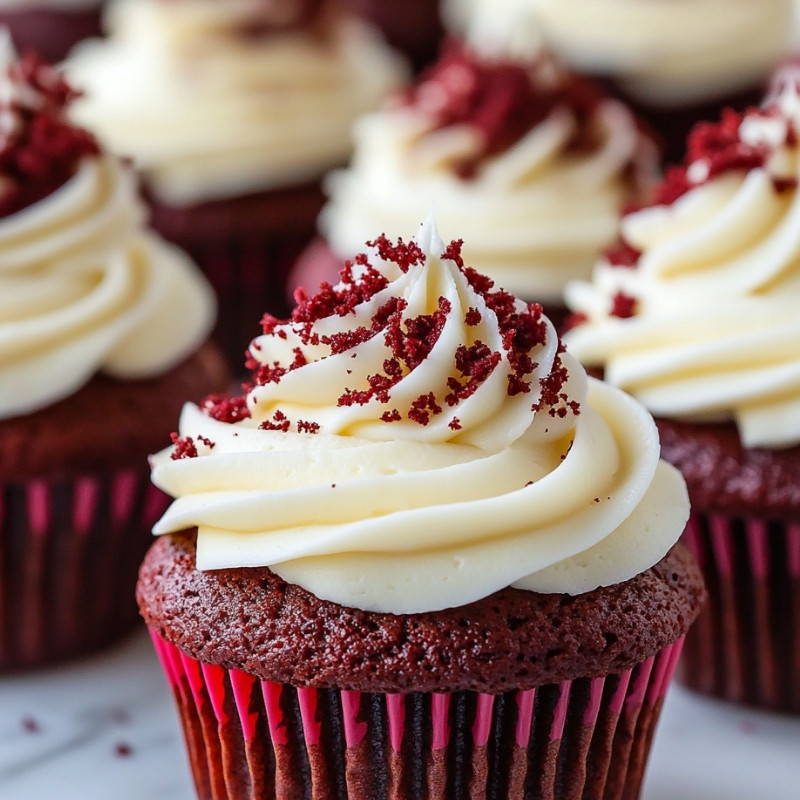
Red velvet cupcakes are a delightful dessert that combines a rich cocoa flavor with a hint of tanginess, thanks to the addition of buttermilk and vinegar. This iconic treat is not only visually stunning with its vibrant red color, but it also offers an irresistible taste experience. Topped with a creamy and luscious cream cheese frosting, these cupcakes are perfect for any celebration or just for a sweet indulgence. Whether you're baking for a birthday, an anniversary, or simply to treat yourself, red velvet cupcakes are sure to impress!
Detailed Ingredients with measures
Plain flour: 250g
Cocoa powder: 15g
Baking soda: 1 tsp
Salt: ½ tsp
Unsalted butter, softened: 115g
Caster sugar: 300g
Large eggs: 2
Buttermilk: 240ml
Vanilla extract: 1 tsp
White vinegar: 1 tbsp
Red food coloring: 2 tsp
Cream cheese, softened: 115g
Unsalted butter, softened: 60g
Icing sugar: 250g
Vanilla extract: ½ teaspoon
Prep Time
15 mins
Cook Time, Total Time, Yield
Cook Time: 20 mins
Total Time: 35 mins
Yield: 12 cupcakes
Directions
1. Preheat oven to 180°C. Line a muffin tin with cupcake liners.
2. In a bowl, sift together flour, cocoa powder, baking soda, and salt. Set aside.
3. In a large bowl, beat butter and sugar until light and fluffy. Add eggs one at a time, mixing well after each.
4. In a small bowl, mix buttermilk, vanilla extract, vinegar, and red food coloring.
5. Gradually add the dry ingredients to the butter mixture, alternating with the buttermilk mixture, beginning and ending with dry ingredients. Mix until just combined.
6. Divide the batter evenly among cupcake liners, filling each about ¾ full.
7. Bake for 18-20 minutes or until a toothpick inserted in the center comes out clean. Let cool completely.
8. For the frosting, beat cream cheese and butter until smooth. Gradually add icing sugar, then mix in vanilla extract.
9. Pipe or spread frosting onto cooled cupcakes. Serve and enjoy!
#redvelvet #cupcakes #baking #homemade #dessertlover #sweettooth #treatyourself #creamcheesefrosting #easybaking #delicious
Detailed Directions and Instructions
Step 1:
Preheat your oven to 180°C (350°F). Line a muffin tin with cupcake liners to prepare for baking.
Step 2:
In a mixing bowl, sift together 250g plain flour, 15g cocoa powder, 1 teaspoon baking soda, and ½ teaspoon salt. Set this dry mixture aside.
Step 3:
In a large mixing bowl, beat together 115g softened unsalted butter and 300g caster sugar until the mixture is light and fluffy. Add in 2 large eggs, one at a time, mixing well after each addition.
Step 4:
In a separate small bowl, combine 240ml buttermilk, 1 teaspoon vanilla extract, 1 tablespoon white vinegar, and 2 teaspoon red food coloring. Mix these ingredients well.
Step 5:
Gradually add the dry ingredients from Step 2 into the butter mixture, alternating with the buttermilk mixture from Step 4. Start and end with the dry ingredients. Mix the batter until just combined, being careful not to overmix.
Step 6:
Divide the batter evenly among the cupcake liners, filling each liner about ¾ full to allow room for rising.
Step 7:
Bake the cupcakes in the preheated oven for 18-20 minutes, or until a toothpick inserted into the center of a cupcake comes out clean. Allow the cupcakes to cool completely in the tin before removing them.
Step 8:
To make the frosting, beat together 115g softened cream cheese and 60g softened unsalted butter in a mixing bowl until the mixture is smooth. Gradually add in 250g icing sugar and mix until fully combined. Finally, mix in ½ teaspoon vanilla extract.
Step 9:
Once the cupcakes are completely cooled, pipe or spread the cream cheese frosting onto each cupcake. Serve and enjoy!
Notes
Note 1:
Make sure all ingredients are at room temperature for better mixing and smoother batter.
Note 2:
You can adjust the amount of red food coloring to achieve your desired shade of red.
Note 3:
For a decorative touch, consider adding sprinkles or chocolate shavings on top of the frosting before serving.
Note 4:
These cupcakes can be stored in an airtight container in the refrigerator for up to 3 days.
Note 5:
If you don't have buttermilk, you can make a substitute by adding 1 tablespoon of white vinegar or lemon juice to 240ml of milk and letting it sit for 5 minutes.
Storage Instructions
Room Temperature
Red velvet cupcakes can be stored in an airtight container at room temperature for up to 2 days. Ensure they are kept away from direct sunlight and humidity.
Refrigeration
If you want to extend their shelf life, place the cupcakes in the refrigerator for up to 5 days. It is best to let them come to room temperature before serving for optimal taste and texture.
Freezing
For longer storage, these cupcakes can be frozen. Wrap each cupcake in plastic wrap and place them in a freezer-safe container. They can be frozen for up to 3 months. Thaw overnight in the refrigerator before serving.
Serving Suggestions
Decoration
These cupcakes can be topped with additional decorations such as sprinkles, edible glitter, or fresh berries for a festive touch.
Pairing
Serve with a glass of cold milk or a hot cup of coffee to complement the rich flavors of red velvet.
Cupcake Stand
Display your cupcakes on a decorative stand for gatherings and celebrations, making them the centerpiece of your dessert table.
Nutritional Information
Per Cupcake (Approximate)
- Calories: 320
- Total Fat: 14g
- Saturated Fat: 8g
- Cholesterol: 55mg
- Sodium: 170mg
- Total Carbohydrates: 45g
- Dietary Fiber: 1g
- Sugars: 32g
- Protein: 3g
Please note that these values may vary based on specific ingredient brands and preparation methods.
Ingredient Substitutions
Flour
You can substitute plain flour with a gluten-free flour blend for a gluten-free version of these cupcakes.
Cocoa Powder
If you prefer a less intense chocolate flavor, use carob powder in the same amount as cocoa powder.
Buttermilk
To make a buttermilk substitute, mix 240ml of milk with 1 tablespoon of lemon juice or vinegar and let it sit for 5-10 minutes.
Red Food Coloring
For an all-natural alternative, use beet juice or pomegranate juice instead of red food coloring for similar coloration.
Cook techniques
Preheating the Oven
Ensure your oven is preheated to 180°C before placing the cupcakes inside. This guarantees even baking throughout the cupcakes.
Sifting Dry Ingredients
Sift together the flour, cocoa powder, baking soda, and salt. Sifting aerates the ingredients, helping to create a light and fluffy texture.
Creaming Butter and Sugar
Beat the softened butter and caster sugar together until light and fluffy. This process incorporates air, which helps in the leavening process during baking.
Incorporating Wet Ingredients
When mixing the buttermilk mixture with the dry ingredients, alternate between the two, beginning and ending with the dry ingredients. This ensures a uniformly mixed batter.
Filling Cupcake Liners
Fill each cupcake liner about ¾ full to allow space for the cupcakes to rise without overflowing.
Checking for Doneness
Use a toothpick inserted in the center of a cupcake to check for doneness. If it comes out clean, the cupcakes are ready.
Cooling Completely
Allow the cupcakes to cool completely before frosting them. This prevents the frosting from melting and ensures a beautiful presentation.
Making Cream Cheese Frosting
Beat the cream cheese and softened butter until smooth before gradually adding the icing sugar, ensuring a well-combined and creamy frosting.
FAQ
Can I substitute buttermilk with regular milk?
You can substitute buttermilk with regular milk, but it may affect the tanginess and moisture of the cupcakes. Adding a splash of vinegar to regular milk can mimic buttermilk.
Is it necessary to use red food coloring?
Red food coloring is traditional for red velvet cupcakes, but you can adjust or omit it if preferred. The flavor and texture will remain the same.
How do I store leftover cupcakes?
Store leftover cupcakes in an airtight container at room temperature for up to 2-3 days, or in the refrigerator for up to a week.
Can I freeze the cupcakes?
Yes, you can freeze the baked cupcakes (without frosting) for up to three months. Ensure they are well-wrapped to prevent freezer burn.
What can I use instead of cream cheese in the frosting?
You can use mascarpone cheese or a whipped buttercream as an alternative to cream cheese for the frosting, although the flavor will change slightly.
Conclusion
The red velvet cupcakes are a delightful combination of rich cocoa flavor and a creamy, tangy cream cheese frosting, making them an ideal treat for any celebration or a simple indulgence at home. Their striking color and soft texture will surely impress friends and family alike. Enjoy baking these classic cupcakes and share the joy they bring!
Red Velvet Cake
Transform your cupcakes into a stunning layered red velvet cake, perfect for birthdays or special occasions.
Red Velvet Whoopie Pies
Create delightful whoopie pies by sandwiching cream cheese frosting between two soft red velvet cookies for a fun twist.
Red Velvet Brownies
Bake fudgy red velvet brownies, combining the classic flavors with a chewy texture, topped with a creamy frosting.
Red Velvet Pancakes
Start your day with festive red velvet pancakes drizzled with cream cheese syrup, adding a sweet touch to breakfast.
Red Velvet Muffins
Enjoy the same flavors in a convenient muffin form, perfect for breakfast on the go or a midday snack.
Red Velvet Trifle
Layer red velvet cake, cream cheese frosting, and whipped cream in a glass for an elegant dessert presentation.
Red Velvet Ice Cream Cupcakes
Combine ice cream with red velvet cupcakes in a scrumptious dessert that’s perfect for warm days.

Leave a Reply