Introduction
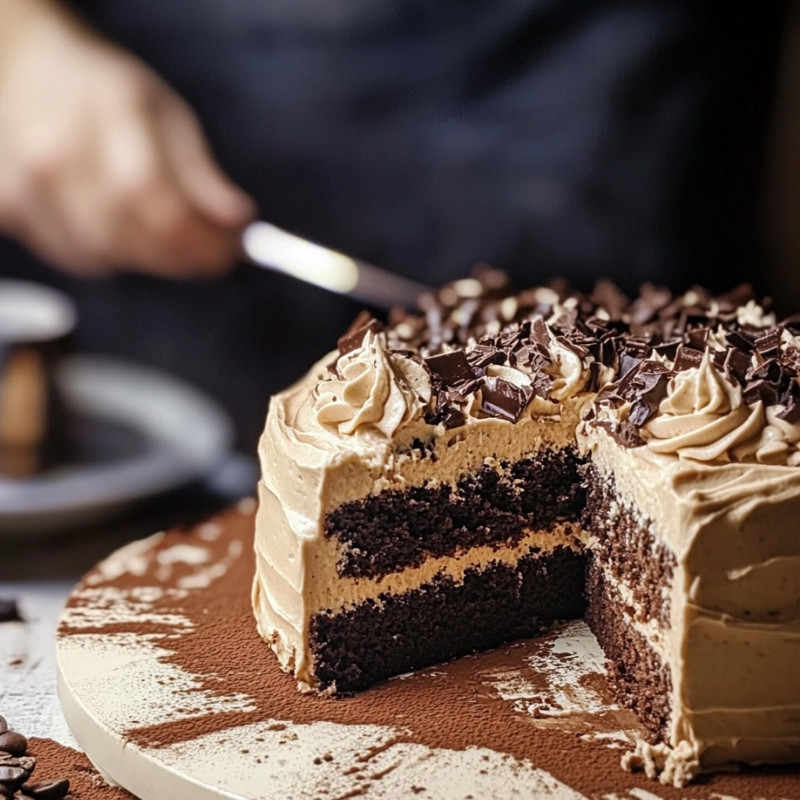
Chocolate Espresso Cake
Rich, moist chocolate cake infused with espresso, topped with a luscious espresso buttercream. The perfect treat for coffee and chocolate lovers alike.
Detailed Ingredients with measures
For the Cake:
- 250g all-purpose flour
- 200g granulated sugar
- 75g unsweetened cocoa powder
- 1 ½ teaspoon baking powder
- 1 teaspoon baking soda
- ½ teaspoon salt
- 2 large eggs
- 250ml whole milk
- 125ml vegetable oil
- 2 teaspoon vanilla extract
- 250ml brewed espresso (cooled)
For the Espresso Buttercream:
- 200g unsalted butter, softened
- 400g powdered sugar
- 2 tablespoon cocoa powder
- 2 tablespoon brewed espresso (cooled)
- 1 teaspoon vanilla extract
Prep Time
Prep Time: 20 minutes
Cook Time, Total Time, Yield
Cook Time: 35 minutes
Total Time: 55 minutes
Yield: 8-10 servings
Directions
1. Preheat the oven to 175°C. Grease and line two 8-inch cake pans.
2. In a large bowl, sift together the flour, sugar, cocoa powder, baking powder, baking soda, and salt.
3. In another bowl, whisk together the eggs, milk, oil, and vanilla extract.
4. Add the wet ingredients to the dry ingredients and mix until just combined.
5. Slowly pour in the cooled espresso while mixing until you have a smooth batter.
6. Divide the batter evenly between the prepared cake pans.
7. Bake for 30-35 minutes, or until a toothpick inserted comes out clean.
8. Let the cakes cool in the pans for 10 minutes before transferring them to a wire rack to cool completely.
9. To prepare the buttercream, beat the butter until light and fluffy.
10. Gradually add the powdered sugar, cocoa powder, and mix until well combined.
11. Add the brewed espresso and vanilla extract, then beat until smooth and creamy.
12. Once the cakes have cooled, spread a layer of buttercream over one cake layer.
13. Place the second cake layer on top and frost the entire cake with the remaining buttercream.
14. (Optional) Garnish with chocolate shavings or coffee beans.
Detailed Directions and Instructions
Step 1: Preheat the Oven
Preheat your oven to 175°C (350°F). Prepare two 8-inch round cake pans by greasing them lightly and lining the bottoms with parchment paper.
Step 2: Prepare Dry Ingredients
In a large mixing bowl, sift together 250g all-purpose flour, 200g granulated sugar, 75g unsweetened cocoa powder, 1 ½ teaspoons baking powder, 1 teaspoon baking soda, and ½ teaspoon salt. Mix well to ensure even distribution.
Step 3: Prepare Wet Ingredients
In another mixing bowl, whisk together 2 large eggs, 250ml whole milk, 125ml vegetable oil, and 2 teaspoons vanilla extract until fully combined.
Step 4: Combine Wet and Dry Ingredients
Add the wet mixture to the dry ingredients. Mix gently until just combined; avoid overmixing, as this could result in a dense cake.
Step 5: Incorporate Espresso
Slowly pour in 250ml of cooled brewed espresso while mixing the batter. Continue mixing until the batter is smooth and well blended.
Step 6: Divide Batter
Carefully divide the batter equally between the two prepared cake pans.
Step 7: Bake the Cakes
Place the pans in the preheated oven and bake for 30-35 minutes, or until a toothpick inserted into the center comes out clean.
Step 8: Cool the Cakes
Once baked, remove the cakes from the oven and let them cool in the pans for 10 minutes. Then, transfer them to a wire rack to cool completely.
Step 9: Prepare the Buttercream
In a mixing bowl, beat 200g of softened unsalted butter until it is light and fluffy.
Step 10: Add Sugar and Cocoa
Gradually add 400g of powdered sugar and 2 tablespoons of cocoa powder to the butter. Mix until well integrated.
Step 11: Add Espresso and Vanilla
Incorporate 2 tablespoons of cooled brewed espresso and 1 teaspoon vanilla extract into the mixture. Beat until the buttercream is smooth and creamy.
Step 12: Frost the First Cake Layer
Once the cakes are completely cooled, spread a layer of espresso buttercream on top of one cake layer.
Step 13: Assemble the Cake
Place the second cake layer on top of the frosted layer. Then, use the remaining buttercream to frost the entire cake evenly.
Step 14: Optional Garnish
For an added touch, you can garnish the top of the cake with chocolate shavings or coffee beans.
Notes
Note 1: Cool Espresso
Ensure the brewed espresso is cooled to room temperature before adding it to the batter and buttercream to prevent melting the mixture.
Note 2: Ingredient Variations
For a richer chocolate flavor, consider using dark cocoa powder.
Note 3: Storage
Store the cake in an airtight container at room temperature for up to 3 days or refrigerate for up to a week.
Note 4: Serving Suggestions
Serve the cake with a side of whipped cream or a scoop of vanilla ice cream to complement the richness.
Note 5: Serving Size
This recipe yields approximately 8-10 servings, depending on portion size.
Cook Techniques
Measuring Ingredients Accurately
Properly measure all your ingredients using a kitchen scale or measuring cups to ensure the best texture and flavor in your cake.
Sifting Dry Ingredients
Sifting flour, cocoa, and other dry ingredients helps to aerate them, resulting in a lighter cake and preventing lumps.
Whisking Wet Ingredients
Whisk the wet ingredients thoroughly to create a good emulsion, ensuring the oil and eggs are well mixed for a uniform batter.
Mixing Methods
When combining wet and dry ingredients, mix until just combined. Over-mixing can lead to a denser cake.
Cooling the Cake
Allow the cakes to cool in the pans for a short time before transferring them to a wire rack. This helps prevent them from breaking apart.
Making Buttercream
Beat the butter until fluffy before adding powdered sugar to ensure a smooth and creamy texture in your frosting.
Frosting Technique
Spread frosting between cake layers and on the outside using an offset spatula for an even and professional finish.
FAQ
Can I use decaffeinated espresso for this recipe?
Yes, decaffeinated espresso can be substituted if you prefer a cake with less caffeine.
What can I use instead of whole milk?
You can substitute whole milk with buttermilk or a non-dairy milk alternative to suit dietary preferences.
How should I store leftover cake?
Store leftover cake in an airtight container at room temperature for up to 3 days, or in the refrigerator for up to a week.
Can I freeze the cake?
Yes, you can freeze the un-frosted cake layers for up to 3 months. Wrap them tightly in plastic wrap and foil.
Why is my cake dense?
A dense cake can be due to over-mixing the batter or inaccurate measurements of ingredients, especially flour.
Can I add different flavors to the buttercream?
Absolutely! You can enhance the buttercream by adding flavors such as vanilla, almond extract, or even different types of cocoa powder.
Conclusion
The Chocolate Espresso Cake is a delightful blend of rich chocolate and bold espresso flavors, making it an irresistible choice for dessert and coffee enthusiasts. Its moist texture and creamy buttercream frosting elevate it to a perfect indulgence, ideal for any occasion.
More recipes suggestions and combination
Chocolate Mint Espresso Cake
Enhance the original recipe by adding peppermint extract to the buttercream frosting. Top with crushed mint candies for a refreshing twist.
Hazelnut Espresso Cake
Incorporate finely chopped hazelnuts into the cake batter for added texture. Use a hazelnut liqueur in the buttercream for a nutty flavor profile.
Mocha Cheesecake
Transform the concept into a cheesecake by swirling espresso and chocolate ganache into a rich cheesecake base. Serve chilled for a decadent dessert.
Espresso Chocolate Chip Cookies
Create a cookie version by adding espresso powder and chocolate chips to your favorite cookie dough. Bake until golden for a chewy treat.
Chocolate Espresso Muffins
Bake muffins using the cake batter as a base. Add chocolate chunks and a sprinkle of espresso on top for a perfect breakfast or snack option.
Espresso Brownies
Make fudgy brownies infused with espresso, using cocoa powder and chunks of chocolate. Frost with a light espresso buttercream for extra richness.

Leave a Reply