
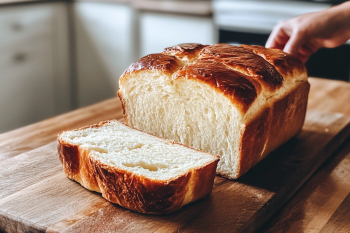
Welcome to the world of easy milk bread loaf. Here, you can make a delicious homemade bread with a simple recipe. Milk bread is loved worldwide for its soft texture and sweet taste.
Imagine biting into a freshly baked, soft, and fluffy loaf of homemade bread. This easy milk bread loaf recipe lets you make a delicious treat. It's perfect for sandwiches, toast, or just enjoying on its own.
Key Takeaways
- Learn how to make a simple bread recipe for a delicious homemade bread
- Discover the secrets to creating a soft and fluffy easy milk bread loaf
- Get started with a simple bread recipe that's perfect for beginners
- Understand the basics of making homemade bread with a simple recipe
- Find out how to create a tender crumb and sweet flavor in your homemade bread
- Explore the world of easy milk bread loaf and homemade bread with a simple bread recipe
The Magic of Easy Milk Bread Loaf
Milk bread is a treat loved worldwide for its soft texture and sweet taste. Moreover, it's easy to make, needing just a few ingredients and simple tools. This makes it perfect for quick bread recipe beginners.
Many find kneading and rising in bread making scary. But, milk bread is a no-knead bread that makes it easy for beginners. Plus, it rises quickly, so you can enjoy a fresh loaf soon.
What Makes Milk Bread Special
Milk bread has a unique taste, with a hint of sweetness and a soft crumb. It's a great beginner bread recipe for those new to baking. Its key features are:
- A soft and fluffy texture
- A sweet and slightly tangy flavor
- A tender crumb that's perfect for sandwiches or toast
Origins and History
Milk bread has a long history, believed to start in Europe. Milk was a key ingredient in many breads back then.
Essential Ingredients for Perfect Milk Bread
To make a delicious bread, like a 5-ingredient bread, you need top-notch ingredients. Moreover, milk bread is made with flour, yeast, salt, sugar, and milk. Quality matters a lot because it affects the bread's texture and taste.
A 5-ingredient bread has:
- Flour: It gives the bread its structure and texture.
- Yeast: This lets the dough rise, making the bread light and airy.
- Salt: It boosts the flavor and controls yeast growth.
- Sugar: It feeds the yeast and helps the bread brown.
- Milk: It adds moisture, tenderness, and a hint of sweetness.
For the best results, use fresh yeast, unbleached flour, and whole milk. Additionally, with the right ingredients and a bit of practice, you can make a tasty 5-ingredient bread.
By using these key ingredients and a simple recipe, you can make a delicious milk bread. It's great for any event. Whether you're new to baking or experienced, using quality ingredients and experimenting is key to a tasty bread.
| Ingredient | Quantity | Purpose |
|---|---|---|
| Flour | 2 cups | Structure and texture |
| Yeast | 1 teaspoon | Rising and light texture |
| Salt | ½ teaspoon | Flavor and yeast control |
| Sugar | 1 tablespoon | Yeast feeding and browning |
| Milk | 1 cup | Moisture and tenderness |
Kitchen Tools You'll Need
To make your homemade bread, you'll need some basic kitchen tools. Additionally, the right equipment can greatly improve your bread's quality and your baking experience.
Before starting, make sure you have all the tools you need.
Basic Equipment List
- Mixing bowl
- Measuring cups
- Wooden spoon
- Baking sheet
Optional but Helpful Tools
Some tools can make making homemade bread easier and more efficient. A stand mixer or a bread machine can be very helpful.
Investing in these tools can make your bread-making process smoother. Remember, the secret to great homemade bread is a simple recipe and organized tools.
| Tool | Description |
|---|---|
| Mixing Bowl | Used for mixing and kneading the dough |
| Measuring Cups | Used for measuring ingredients accurately |
| Wooden Spoon | Used for mixing and blending the dough |
Understanding the Science Behind Milk Bread
To make a perfect easy milk bread loaf, you need to know the science. This means learning about the chemistry of bread making. Yeast is key in fermentation, which makes bread rise.
The recipe for easy milk bread relies on yeast, sugar, and warmth. Also, these ingredients help produce carbon dioxide. This gas makes the dough expand.
Temperature and humidity are also important when making milk bread. In addition, yeast likes a warm, moist environment. This is between 75°F and 85°F, with 75% to 85% humidity.
A beginner bread recipe will guide you to create this perfect environment. This ensures your easy milk bread loaf turns out great.
Some key factors to consider when making milk bread include:
- Yeast quality and quantity
- Temperature and humidity control
- Sugar content and type
- Dough handling and mixing techniques
Understanding these factors helps you make a delicious easy milk bread loaf. Furthermore, the process of fermentation and yeast's role are crucial. Mastering these will help you make a perfect loaf every time.
With practice and patience, you can make a delicious easy milk bread loaf. Moreover, it's great for sandwiches, toast, or just snacking. Start with a beginner bread recipe. Moreover, as you get better, try new ingredients and techniques to make your own unique bread.
Step-by-Step Mixing Process
To make a tasty milk bread, following a simple recipe is key. The mixing process is vital for the dough's texture and structure. It's important to mix the ingredients in the right order and until they form a smooth dough.
Start by mixing dry ingredients like flour, sugar, and yeast in a big bowl. Then, add wet ingredients like milk, eggs, and butter. Mix until a shaggy dough forms. Moreover, a simple recipe helps ensure the right ingredient amounts.
Creating the Perfect Dough
To make the perfect dough, knead it for a long time. Also, you can use a stand mixer or knead by hand. Moreover, kneading develops the dough's gluten, making it chewy. For quick bread, knead just until it comes together to avoid a dense bread.
Kneading Techniques
There are different kneading methods, like the push-down, fold, and turn. Also, push down, fold in half, and turn 90 degrees. Do this for a few minutes until the dough is smooth and elastic. In addition, a simple recipe will guide you through kneading for the right texture.
Visual Cues for Proper Consistency
While kneading, look for signs of the right consistency. In addition, the dough should be smooth, shiny, and slightly sticky. If it's too dry, add a bit more milk. If too wet, add flour. By following a simple recipe and watching for these signs, you'll make a delicious milk bread.
The First Rise: Keys to Success
Making homemade bread starts with the first rise. This step is crucial. Besides that, to get it right, you need to know how temperature and humidity affect yeast. A good bread recipe can fail if these conditions aren't just right.
Here are some important things to think about during the first rise:
- Temperature: Yeast loves warm places, between 75°F and 80°F.
- Humidity: A bit of moisture in the air helps the dough. It makes yeast work better.
- Yeast quality: Using top-notch, active yeast is key for a good rise.
By managing these factors, you can make a perfect environment for your bread. While waiting for it to rise, you can get ready for the next steps.

Remember, making homemade bread takes patience. With the right conditions and a bit of time, you'll soon have a fresh, tasty loaf.
Shaping Your Loaf
Shaping your easy milk bread loaf is key in bread-making. It needs skill and patience, but with practice, you'll get it right. Besides that, start with a simple recipe to make a light and fluffy loaf.
There are many ways to shape your loaf, like the boule, batard, and baguette. Each method has its own way, but always handle the dough gently. This prevents a dense loaf, which is not what you want for an easy milk bread.
Different Shaping Methods
- Boule: This method shapes the dough into a round ball. It makes a rustic-looking loaf great for soups or stews.
- Baguette: This method shapes the dough into a long, thin loaf. It's perfect for a crispy crust and soft inside.
- Batard: This method shapes the dough into a shorter, wider loaf. It's ideal for sandwiches or toast.
Avoiding Common Shaping Mistakes
To avoid common mistakes, handle the dough gently and don't over-work it. Make sure the dough is at room temperature before shaping. By following these tips and using a simple recipe, you'll make a beautiful easy milk bread loaf.
| Shaping Method | Description |
|---|---|
| Boule | Rustic-looking round loaf |
| Baguette | Long, thin loaf with crispy crust |
| Batard | Shorter, wider loaf perfect for sandwiches |
The Second Rise: Timing and Temperature
The second rise is key in making a simple bread recipe. Additionally, it's where the dough changes into a fluffy loaf. Timing and temperature are crucial for a good second rise. Quick bread recipes, for example, need a shorter rise because of fast-acting yeast.
The best temperature for the second rise is between 75°F and 80°F (24°C and 27°C). Additionally, this warm spot helps yeast work and makes the dough rise. The rise time varies based on yeast type, temperature, and dough strength. Generally, it should take 1-2 hours, or until the dough doubles in size.
Here are some tips for a successful second rise:
- Use a consistent temperature: Avoid drafts or extreme temperatures to keep the rise steady.
- Monitor the dough's progress: Regularly check the dough to see if it's rising as expected.
- Don't overproof: Let the dough rise until it's just doubled, then shape and bake.
By following these tips and using a simple or quick bread recipe, you'll make a tasty homemade loaf. Keep an eye on temperature and timing. Also, don't be afraid to try different recipes and techniques to find your favorite bread.
| Temperature Range | Second Rise Time |
|---|---|
| 75°F - 80°F (24°C - 27°C) | 1-2 hours |
Baking Your Perfect Loaf
Baking is the last step to make delicious homemade bread. Getting it right is crucial for a light, fluffy loaf with great flavor. It's all about the oven temperature and baking time.
The ideal oven temperature for bread is between 375°F and 425°F. The baking time varies, but aim for 25-40 minutes. Your bread should have a golden crust and sound hollow when tapped.
Oven Temperature Guidelines
- Preheat your oven to the correct temperature before baking
- Additionally, use an oven thermometer to ensure accuracy
- Moreover, adjust the temperature as needed to achieve the perfect crust
Visual Doneness Indicators
A perfectly baked loaf has a golden crust and a soft inside. Tap the bottom to check for a hollow sound. The crust should be deep golden brown.

With practice and patience, you can make a delicious bread recipe. Moreover, it's all about understanding oven temperature and baking time. Use visual cues to ensure your loaf is perfectly baked.
| Oven Temperature | Baking Time | Visual Doneness Indicators |
|---|---|---|
| 375°F | 25-30 minutes | Golden brown crust, hollow sound |
| 400°F | 20-25 minutes | Deep golden brown crust, soft interior |
| 425°F | 15-20 minutes | Dark golden brown crust, crispy exterior |
Cooling and Storage Tips
After baking your easy milk bread loaf, it's key to cool it right. This keeps its texture and taste just right. Cooling on a wire rack lets air get to the loaf, stopping moisture from getting trapped. This is super important for beginners, as it keeps the bread soft and fresh.
To keep your easy milk bread loaf fresh, store it in an airtight container at room temperature. You can also freeze your bread for up to two months. When freezing, wrap the bread tightly in plastic wrap or aluminum foil to avoid freezer burn. Some key tips for cooling and storing your bread include:
- Cooling your bread on a wire rack to prevent moisture buildup
- Furthermore, storing your bread in an airtight container to maintain freshness
- Also, freezing your bread for up to two months to extend its shelf life
By following these simple cooling and storage tips, you can enjoy your delicious easy milk bread loaf for a longer time. Whether you're a beginner or an experienced baker, these tips will help you to keep your bread fresh and flavorful.
| Cooling and Storage Methods | Benefits |
|---|---|
| Cooling on a wire rack | Prevents moisture buildup, maintains texture |
| Storing in an airtight container | Maintains freshness, keeps bread soft |
| Freezing | Extends shelf life, preserves flavor |
Troubleshooting Common Issues
Even with simple bread recipes, problems can happen. We've got tips to help you fix these issues. Whether it's texture, rising, or crust problems, we've got you covered.
Some common bread-making problems include:
- Texture problems: dense or tough bread
- Rising issues: bread that doesn't rise or rises too much
- Crust concerns: crust that's too dark or too light
To solve these problems, try these tips:
Texture Problems
Check your ingredient ratios and avoid overmixing. A simple bread recipe can handle mistakes, but overmixing makes bread tough.
Rising Issues
Also, ensure your yeast is active and the dough is at the right temperature. Quick bread recipes can have rising problems, so watch your dough closely.
Crust Concerns
Adjust your oven temperature and baking time for the perfect crust. Additionally, with practice, a simple bread recipe can give you a beautiful crust.
By using these tips, you'll make delicious bread with ease. Happy baking!
| Common Issue | Troubleshooting Tip |
|---|---|
| Texture problems | Check ingredient ratios and avoid overmixing |
| Rising issues | Check yeast activity and dough temperature |
| Crust concerns | Adjust oven temperature and baking time |
Creative Variations and Add-ins
Making homemade bread lets you try new ingredients and flavors. With a basic delicious bread recipe, you can mix things up. Try using whole wheat or rye flour, or add nuts, seeds, or spices.
Chopped walnuts or pecans can add texture and taste to your bread. You can also use sesame or poppy seeds for extra nutrition and look. For a savory twist, try adding rosemary or thyme for a fragrant loaf.
- Dried fruits, such as cranberries or cherries, for a sweet and fruity flavor
- Additionally, chocolate chips or cocoa powder for a decadent and rich treat
- Also, herbs, like basil or oregano, for a fresh and savory flavor
Exploring these ingredients can lead to many delicious bread recipes. Whether it's for a big event or a quick snack, the fun is in trying new things.
Additionally, if you’re looking for another take on this soft and fluffy bread, check out this Japanese Milk Bread recipe for a delicious twist!
Serving Suggestions
Now that you've baked your easy milk bread loaf, it's time to think about serving it. Serving suggestions can really enhance your bread experience.
Your milk bread loaf is great for any meal. Also, try it with scrambled eggs, avocado, or smoked salmon for breakfast. Additionally, for lunch or dinner, it's perfect with soups, salads, or as a side dish.
Perfect Pairings
Here are some great pairings for your easy milk bread loaf:
- Soups: creamy tomato soup or warm chicken noodle soup
- Salads: a fresh green salad or a hearty grain salad
- Spreads: butter, jam, or honey for a sweet treat
Time of Day Recommendations
Here are some times to serve your easy milk bread loaf:
- Breakfast: toast with eggs, cheese, or bacon
- Lunch: as a sandwich or a side to soup
- Dinner: as a side to roast chicken or beef stew
Health Benefits of Homemade Bread
Making homemade bread, like a simple bread recipe, offers many health benefits. Moreover, you can control what goes into it, cutting down on unhealthy additives and preservatives. This is great for people with dietary restrictions or preferences, as they can make bread that fits their needs.
A quick bread recipe can also have a lower glycemic index than store-bought bread. This helps keep blood sugar levels stable. Also, homemade bread usually has more fiber, which is good for your digestive health and gut bacteria. Additionally, to make healthier bread, try using whole wheat flour, adding nuts and seeds, and using less sugar.
By making your own bread, you can choose what goes into it. Furthermore, this leads to a healthier diet and the joy of eating freshly baked bread. It's a rewarding hobby that offers many benefits.
Some key benefits of homemade bread include:
- Control over ingredients
- Lower glycemic index
- Higher fiber content
- Reduced preservatives and additives
Making homemade bread is a healthy and rewarding hobby. Also, it provides many benefits for those who take the time to create their own simple or quick bread recipe.
Conclusion: Mastering Your Milk Bread Journey
As you finish your homemade bread journey, think about all you've learned. Making milk bread at home is a labor of love. The soft texture and amazing smell are unbeatable.
Remember the key ingredients and techniques from this guide. Additionally, with time and effort, you'll get better at making bread. Try new mix-ins and shapes to make each loaf special.
If you run into problems, don't worry. Check the troubleshooting section for help. Learning about bread baking will give you more control over your creations.
For a cozy and delicious treat, try this Homemade Cinnamon Apple Bread recipe—perfectly warm, comforting, and full of flavor!
So, enjoy every step of your bread-making journey. Milk bread baking is a lifelong adventure. Share your delicious bread with others and have fun baking!
FAQ
What makes milk bread so special?
Milk bread is loved for its soft crumb and sweet taste. It's also easy to make with just a few ingredients and simple tools.
What are the essential ingredients for making milk bread?
To make milk bread, you need flour, yeast, salt, sugar, and milk. Using top-quality ingredients makes a big difference.
What kitchen tools do I need to make milk bread?
You'll need a mixing bowl, measuring cups, a wooden spoon, and a baking sheet. A stand mixer or bread machine can also help.
How do I create the perfect dough for milk bread?
Mixing the dough right is key. Watch the temperature, yeast, and kneading to get the dough just right.
What are the keys to a successful first rise?
For a great first rise, keep the temperature and humidity right. Also, check the yeast activity. Fixing common first rise problems helps a lot.
How do I shape my milk bread loaf?
You can shape it like a boule, batard, or baguette. Avoid over-working the dough and making it too dense.
How do I ensure a successful second rise?
The second rise needs the right timing and temperature. Keep it in the ideal range and let it rise for the right time.
How do I know when my milk bread is done baking?
Use oven temperature and look for crust color and tapping sounds. These signs tell you when it's done.
How should I cool and store my homemade milk bread?
Cool it on a wire rack and store in an airtight container. This keeps it fresh and tasty.
What are some common issues I might encounter when making milk bread, and how can I troubleshoot them?
Issues like texture, rising, and crust can happen. Fixing these problems improves your bread-making skills.
Can I get creative with my milk bread recipe?
Yes! Try different flours, nuts, seeds, and spices for tasty variations.
What are some perfect pairings and serving suggestions for my homemade milk bread?
Milk bread goes well with soups, salads, and spreads. Enjoy it any time, from breakfast to dinner.
What are the health benefits of making homemade bread?
Homemade bread, like milk bread, is healthier. You control the ingredients, it's lower glycemic, and has more fiber.

Leave a Reply